# Maven 如何自定义脚手架
# 引言
在项目越来越多的背景下要保证开发效率保证系统稳定,项目标准化将不可避免,其中最开始的就是要有一个或多个骨架工程。 使用这些骨架工程开发实现统一的设计理念,技术栈,功能组件,架构风格,开发规范等一致的约束。
# Maven 的脚手架是什么
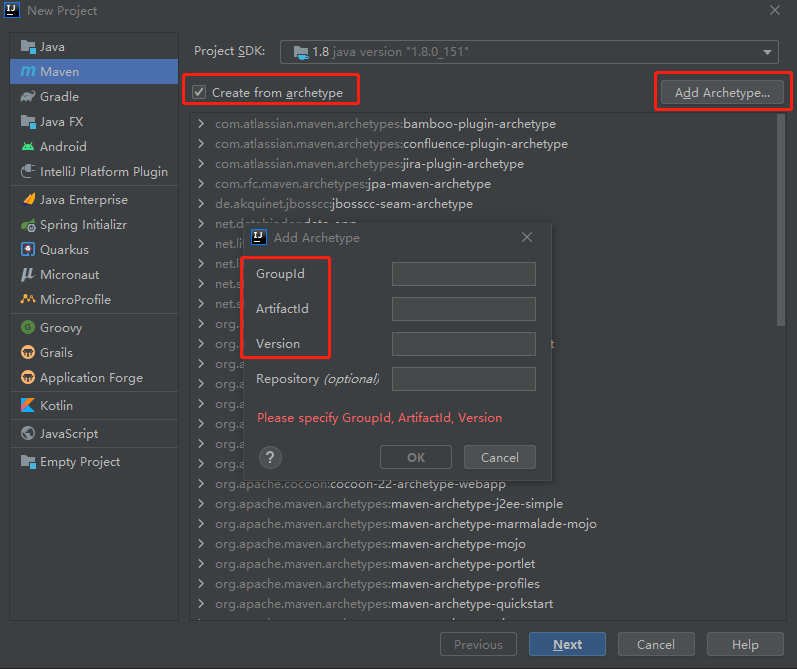
在 idea 的创建项目中这些选择就是离我们最近的 maven 脚手架。

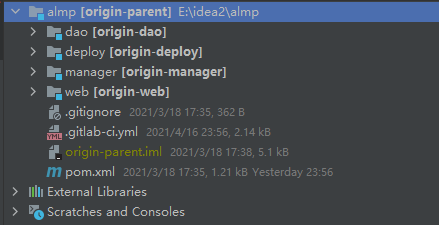
脚手架的工程目录结构与常见 maven 开发工程差异体具体如下(红色代表定死的,蓝色代表可更改的)

最外层的 archetype 文件夹下的 pom.xml 文件
<build> | |
<extensions> | |
<extension> | |
<groupId>org.apache.maven.archetype</groupId> | |
<artifactId>archetype-packaging</artifactId> | |
<version>2.2</version> | |
</extension> | |
</extensions> | |
<pluginManagement> | |
<plugins> | |
<plugin> | |
<artifactId>maven-archetype-plugin</artifactId> | |
<version>2.2</version> | |
</plugin> | |
</plugins> | |
</pluginManagement> | |
</build> |
通过上面图二生成的工程目录
# 如何自定义一个脚手架工程
# 工程创建
- 除了根据前面目录结构手动组装一个脚手架的 maven
- 我更推荐先准备一个标准的 maven 工程,再在根目录执行 mvn archetype:create-from-project 命令即可根据这个工程生成它的脚手架原型,路径是执行命令的目录下 target/generated-sources/archetype 目录。这个目录就是脚手架的 maven 工程,然后再根据情况调整。
# 工程编辑
首先对 META-INF/maven/archetype-metadata.xml 的主要参数解释
<!-- 参数 --> | |
<requiredProperties> | |
<requiredProperty key="appName"> | |
<defaultValue>defaultapp</defaultValue> | |
</requiredProperty> | |
<requiredProperty key="projectName"> | |
<defaultValue>${appName}</defaultValue> | |
</requiredProperty> | |
<requiredProperty key="groupId"> | |
<defaultValue>cn.tanzhou.${appName}</defaultValue> | |
</requiredProperty> | |
</requiredProperties> | |
<!-- fileSets 是脚手架创建工程时会生成 archetype-resources 目录下的哪些文件 --> | |
<fileSets> | |
<!-- filtered 是要创建的文件中的占位符变量需要替换 encoding 是文件的编码格式 packaged 设置 false 可以防止 directory 属性内的文件路径下创建__packageInPathFormat 文件夹 --> | |
<fileSet filtered="true" encoding="UTF-8" packaged="false"> | |
<!-- 相对路径 按照上面图片这个路径指的是 archetype-resources 目录下 --> | |
<directory></directory> | |
<!-- 要生成的文件 --> | |
<includes> | |
<include>pom.xml</include> | |
</includes> | |
</fileSet> | |
</fileSets> | |
<!-- module 是指子工程 id 是工程的 artifactId 在多层嵌套下用。表示层级 dir 是目录在多层嵌套下用 / 表示层级,name 是子工程的的名称在多层嵌套下用。表示层级 --> | |
<module id="origin-web" dir="web" name="origin-web"> | |
<fileSets> | |
<fileSet filtered="true" packaged="true" encoding="UTF-8"> | |
<!-- 相对路径 按照上面图片这个路径指的是 archetype-resources/web/src/main/java 目录下 --> | |
<directory>src/main/java</directory> | |
<includes> | |
<include>**/*.java</include> | |
<include>**/**</include> | |
</includes> | |
</fileSet> | |
</fileSets> | |
</module> |
关于参数的占位符使用
- 在 xml 文件内关于参数使用通过 ${参数变量}, 也可以用__参数变量__方式
- 文件夹上使用参数的方式是__参数变量__方式
- 在 java 文件内使用参数的方式是 $
# 工程使用
首先将调整好的 maven 脚手架工程执行 mvn install 打包构建到本地仓库,或者执行 mvn deploy 打包构建到远程私有库上 (本章没讲 deploy 上传配置)
第一种使用方式:idea 可以导入自定义脚手架 仅需要填写 GroupId (在 maven 仓库内的包路径),ArtifactId (在包路径目录下的文件名),Version (版本号),通过以上参数就可以定位准确了。Repository 是指第三方 maven 仓库,比如私有库地址。但这样支持自定义其它参数的脚手架将难以使用。
第二种:通过 maven 命令创建项目。相比 idea 更加灵活一些
mvn archetype:generate // 表示要创建一个 maven 工程 | |
-DinteractiveMode=false // 表示不是交互模式,不用选择 | |
-DarchetypeCatalog=internal // 联网模式 还有 local 表示使用本地仓库 | |
-DarchetypeRepository=http://xxx/maven-public/ // 设置源 | |
-DarchetypeGroupId=cn.com.cs // 模板所在的组 | |
-DarchetypeArtifactId=service-template // 模板的 id | |
-DarchetypeVersion=1.2.0-SNAPSHOT // 版本 | |
-DgroupId =com.cn // 项目造出来后 java 文件夹下的路径组 (这个项目打包后这就是 maven 仓库的文件路径) | |
-DartifactId=xirizhi-web // 项目的名字 id (这个项目打包后就是 GroupId 路径下的文件名字) | |
-DappName=xxx // 自定义的 appName 的参数 | |
... |
# Maven 上传包到私库
maven 的 setting.xml 文件内配置
<servers> | |
<server> | |
<id>snapshots</id> | |
<username>admin</username> | |
<password>123456</password> | |
</server> | |
<server> | |
<id>releases</id> | |
<username>admin</username> | |
<password>123456</password> | |
</server> | |
</servers> | |
<profiles> | |
<profile> | |
<!-- 为这个私库配置定义一个 id --> | |
<id>new</id> | |
<repositories> | |
<repository> | |
<!-- 这个 id 对应上面的账号 id --> | |
<id>release</id> | |
<!-- 私库路径 --> | |
<url>http://xxx:8888/repository/tzedu-cs-arch-release/</url> | |
<!-- 是否可推送正式包 --> | |
<releases> | |
<enabled>true</enabled> | |
</releases> | |
<!-- 是否可推送快照包 (固定的.SNAPSHOT 文件名结尾的.jar) --> | |
<snapshots> | |
<enabled>false</enabled> | |
</snapshots> | |
</repository> | |
<repository> | |
<id>snapshot</id> | |
<url>http://xxx:8888/repository/tzedu-cs-arch-snapshot/</url> | |
<releases> | |
<enabled>false</enabled> | |
</releases> | |
<snapshots> | |
<enabled>true</enabled> | |
</snapshots> | |
</repository> | |
</repositories> | |
</profile> | |
</profiles> | |
<!-- 默认使用哪个配置 --> | |
<activeProfiles> | |
<activeProfile>new</activeProfile> | |
</activeProfiles> |
在项目 pom 文件内配置(不知道在 maven 工程配置内账号密码怎么搞)
<distributionManagement> | |
<!-- 配置正式包私库源 --> | |
<repository> | |
<!-- id 对应 maven 仓库 setting 文件内配置的账号 server 的 id --> | |
<id>releases</id> | |
<url>http://xxx:8888/repository/tzedu-cs-arch-release/</url> | |
</repository> | |
<!-- 配置快照包私库源 --> | |
<snapshotRepository> | |
<!-- id 对应 maven 仓库 setting 文件内配置的账号 server 的 id --> | |
<id>snapshots</id> | |
<url>http://xxx:8888/repository/tzedu-cs-arch-snapshot/</url> | |
</snapshotRepository> | |
</distributionManagement> |
题外:多模块构建时,可在不需要上传私库的模块下 pom 文件内配置一下
<properties> | |
<maven.deploy.skip>true</maven.deploy.skip> | |
</properties> |
# Maven 自定义脚手架推荐其它教程
多看几篇你就懂了
- maven archetype tips
- 基于 maven 的项目脚手架,一键创建项目的项目模板
# 总结
maven 的自定义脚手架其实也不难嘛~(来自懂王的蜜汁自信)